Connect a generator to Wi-Fi using a web browser
If the Mobile Link app setup fails, try connecting your generator to Wi-Fi using a web browser. This method can bypass app issues and still allows monitoring and control through the Mobile Link app or website.
Note: For best results, use the recommended Wi-Fi setup process in the Mobile Link for Generators app before trying this method. For instructions, see How do I connect my generator to a home Wi-Fi network?
Environment
Note: This process will not work for the aftermarket Wi-Fi/Ethernet device or the Connectivity Cellular Accessory. If you are trying to connect the discontinued Wi-Fi/Ethernet device see: Connecting the Wi-Fi/Ethernet Mobile Link device to your home network
Struggling to connect or stay connected?
Meeting the network requirements outlined in this article will resolve most connectivity issues. However, upgrading to the Connectivity Cellular Accessory is recommended for users who wish to add connectivity to their generator or users experiencing ongoing connectivity issues. It is compatible with more generators , and uses multiple carrier networks to offer greater coverage. Basic (free) and Premium cellular plans are available for this device. See here to upgrade: Connectivity Cellular Accessory .
Check connectivity before subscribing
Before purchasing a subscription, homeowners should ensure that their generator has a reliable cellular or Wi-Fi connection. Refunds are not available for issues caused by poor connectivity. A Mobile Link device is required. For details, see the Mobile Link Wi-Fi, Cellular, and LTE device compatibility guide.
Wi-Fi requirements
- A dedicated 2.4 GHz network that supports 802.11b/g/n protocols is required. For more information, see Is My Wi-Fi Network Compatible With Mobile Link?
- 5 GHz or dual-band networks are not supported.
- Setting up a separate SSID for your 2.4 GHz network is strongly recommended to maintain a stable connection.
How does this process work?
This setup connects to the generator’s temporary Wi-Fi network (MLG XXXXX) and uses a web browser to configure the generator's connection to the home Wi-Fi network. After setup, the generator can be monitored using the Mobile Link for Generators app or website.
Sections
Prepare the generator control panel for connection to a Wi-Fi network
Before connection to the internet, the generator control panel must be put in Wi-Fi pairing mode.
1. Go to the generator, unlock it, and raise the cover.
2. Locate the control panel on the right side of the open generator, then press the OFF button.
Note: The control panel is the display screen and series of buttons pictured below.
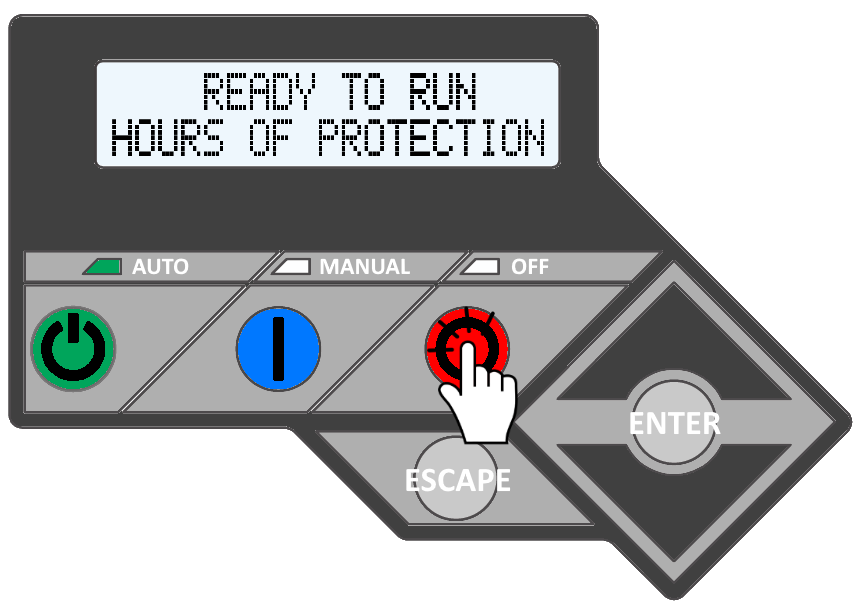
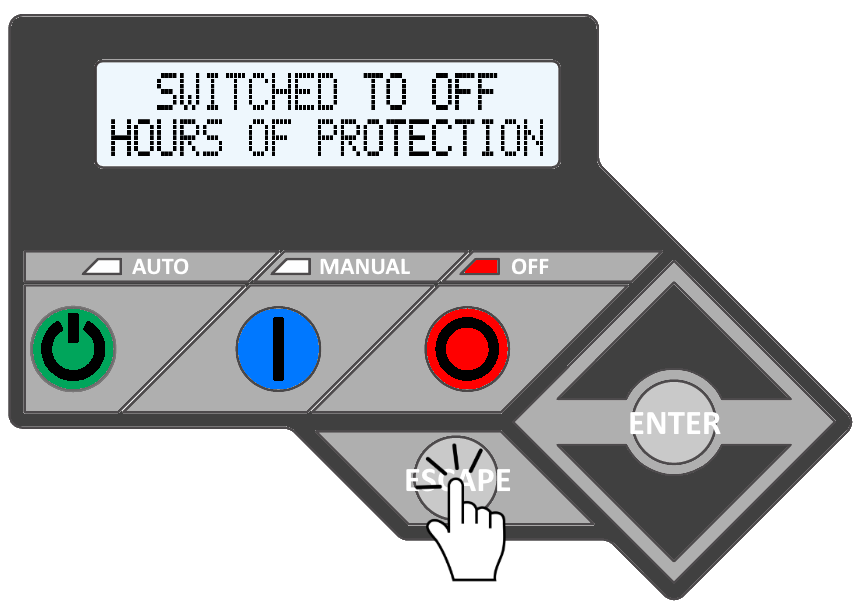
Note: The generator needs to be in off mode (SWITCHED TO OFF) to access Wi-Fi pairing mode and to ensure that the generator does not attempt to start during this process. The Final setup section ensures the generator is returned to a READY TO RUN state after connecting.
3. Press the ESCAPE button to access the control panel's main menu.
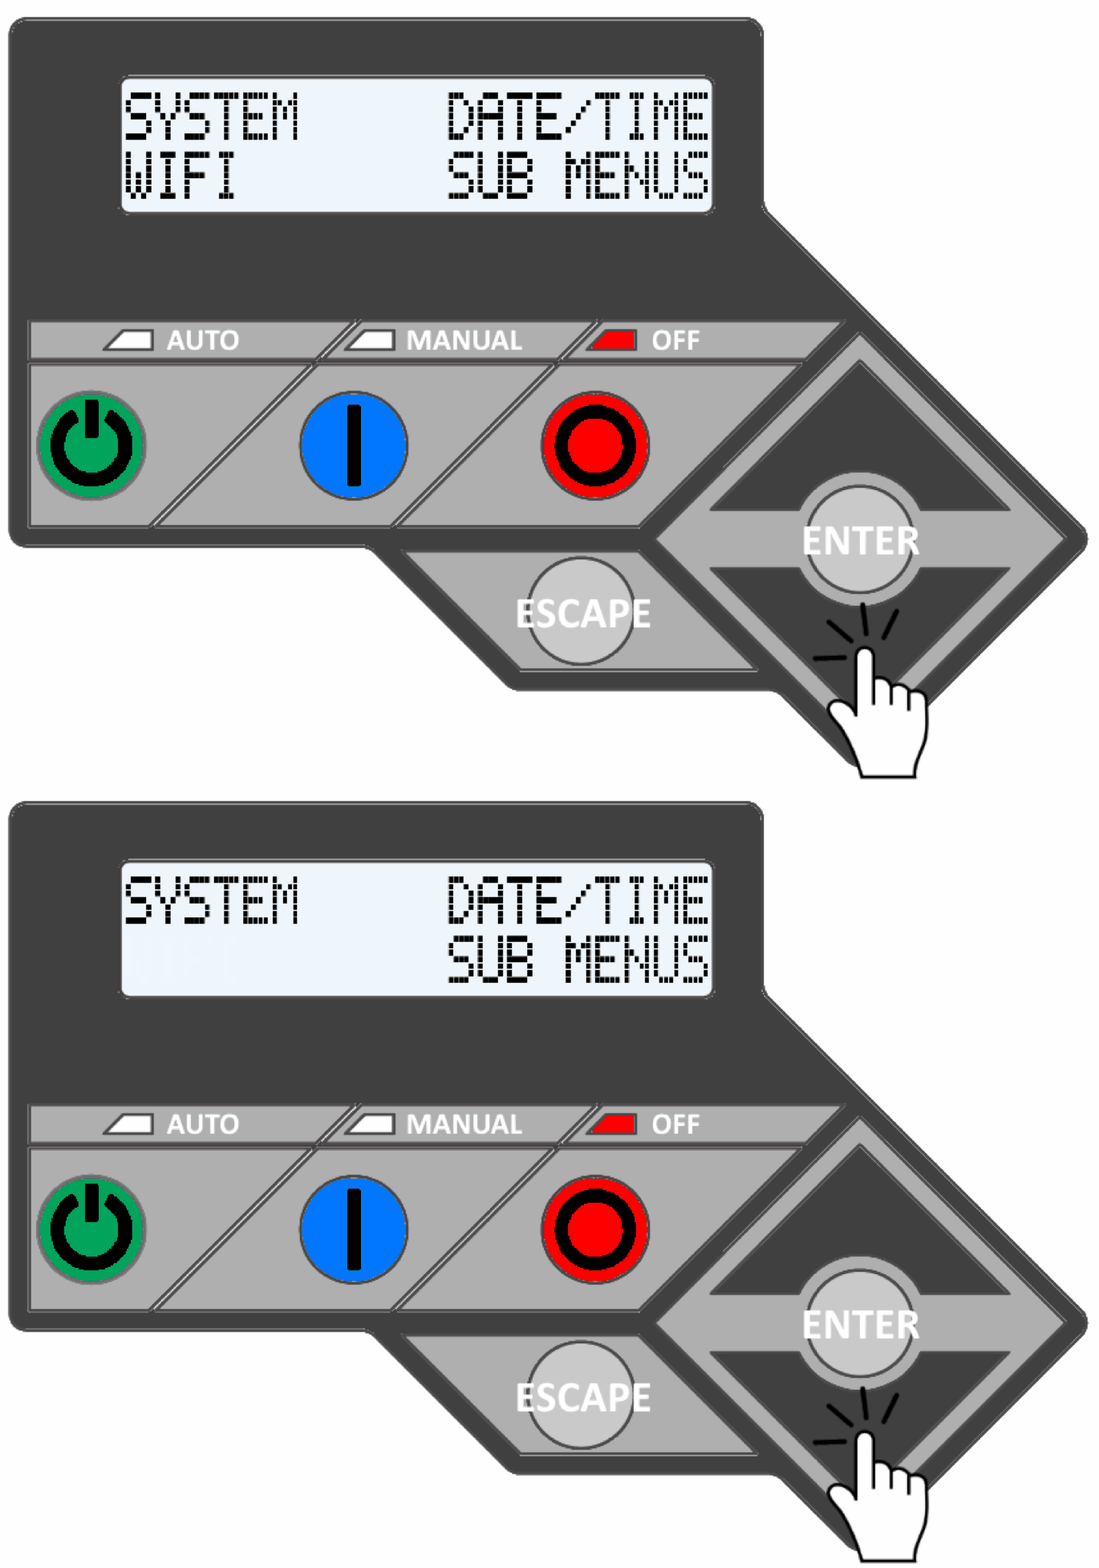
4. Using the up and down arrow keys above and below the ENTER button, press the down arrow to select the WIFI or SETUP WIFI option, then press ENTER.
Note: If you do not see a WIFI option in your menus, see the note in the Environment section above.
or
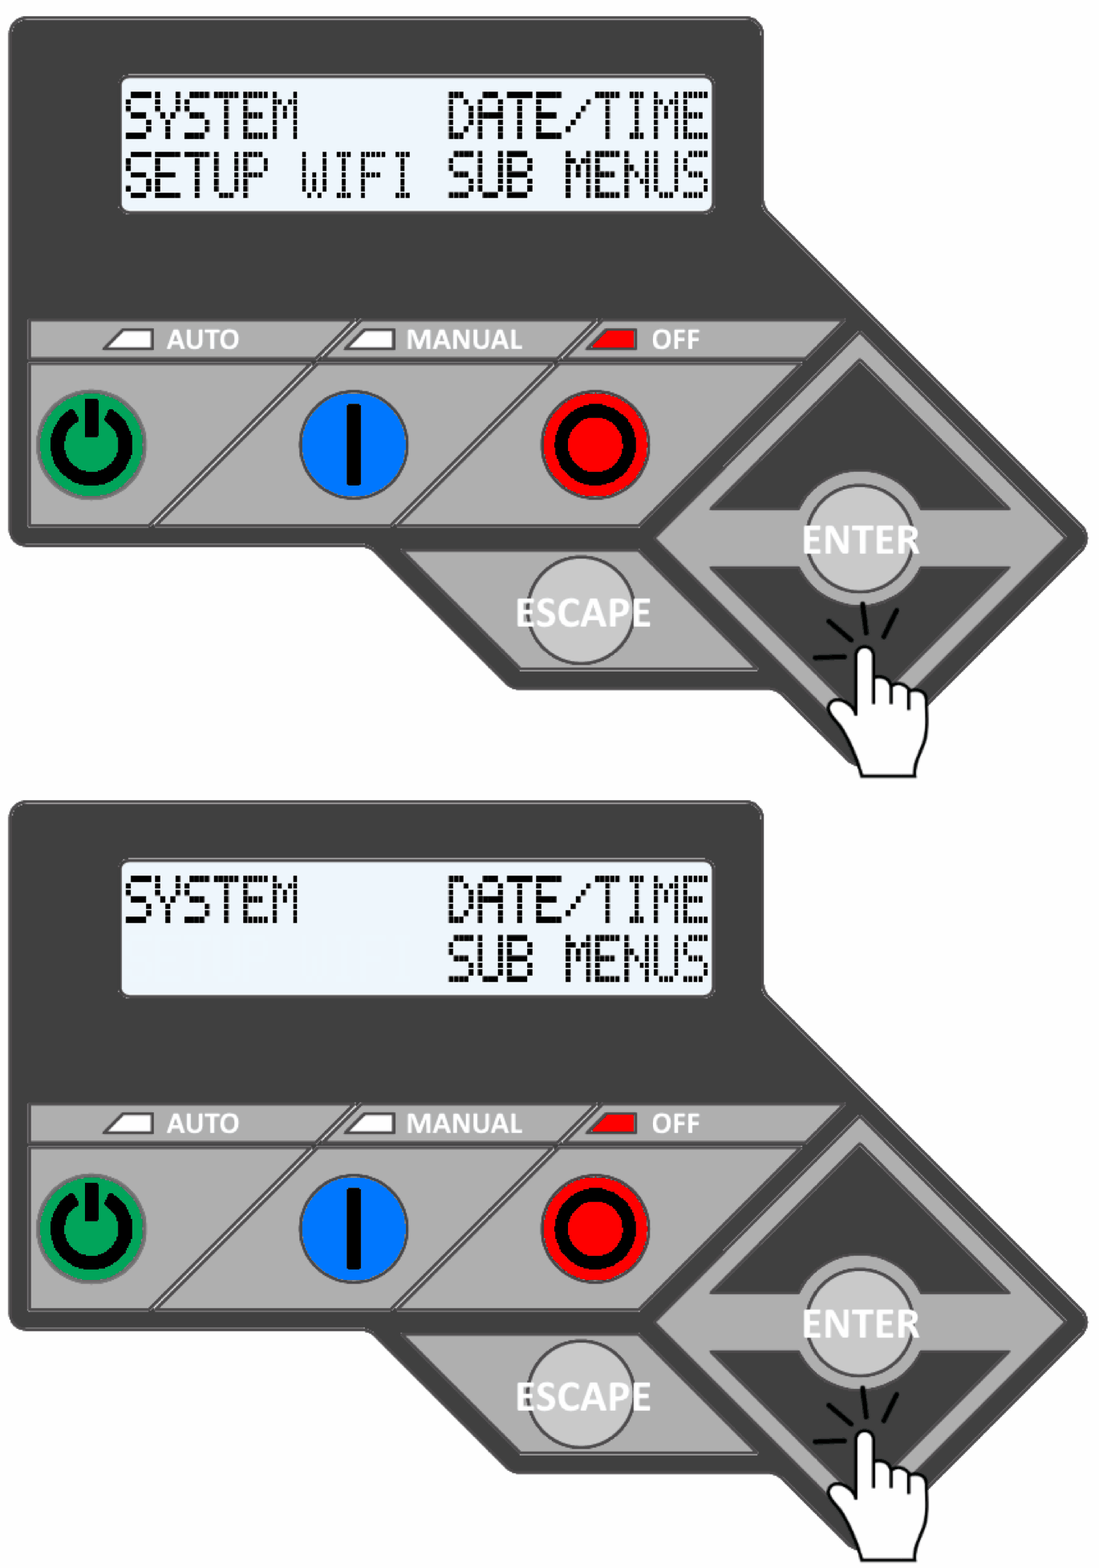
Note: If your control panel display is not flashing, see Why is my control panel display not flashing or blinking to indicate the selected menu?
5. After pressing ENTER on WIFI or SETUP WIFI, the screen will display one of the following:
-
- If SETUP WIFI? is displayed, use the arrow keys to select YES and then press ENTER.
- If something other than SETUP WIFI? is displayed, use the arrow keys to scroll until REDO WIFI SETUP? NO is displayed, and press ENTER. Next, use the arrow keys to scroll until YES is displayed, and press ENTER again.
- If SEARCHING is displayed, follow the steps in the sentence above to scroll up and redo Wi-Fi setup.
Note: If the generator screen seems frozen or unresponsive, see How Do I Perform a Hard Reset on a Home Standby System?
6. The generator's control panel should now display SET TO AP - PLEASE WAIT. After two to three minutes, the screen should change and display SETUP WIFI NOW!
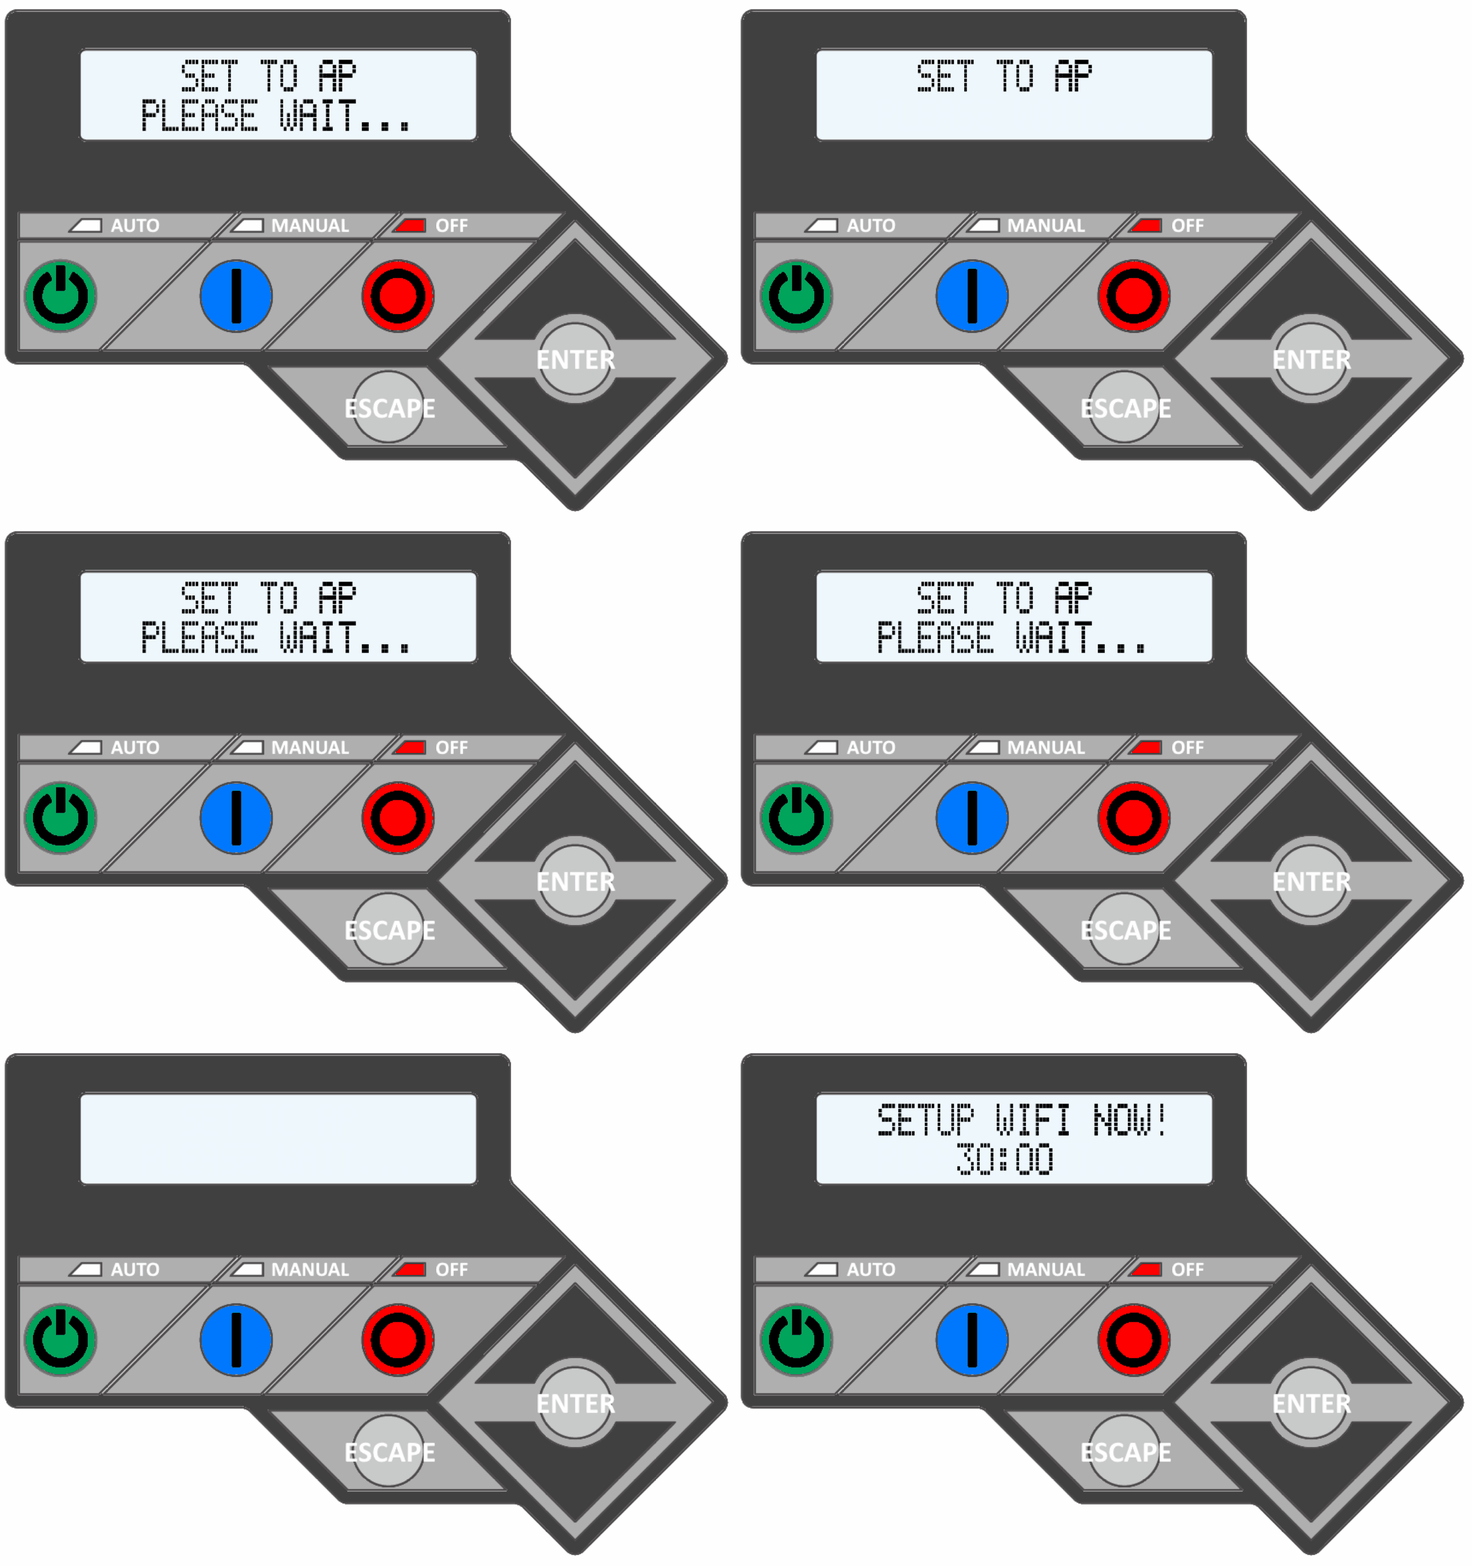
Note: If the control panel displays SET TO AP - PLEASE WAIT for more than 3 minutes or fails to advance to SETUP WIFI NOW!, verify that the Mobile Link Wi-Fi device is plugged into the control panel. The Wi-Fi device may need to be reconnected or the control panel may need to be reset. See What do I do when my Mobile Link Wi-Fi is stuck on "Set to AP, please wait..." during connection?
7. Once the screen displays SETUP WIFI NOW!, click the appropriate link for your device:
Note: A timer and a number beginning with MLG will alternate on the generator's screen. This is normal. The MLG number will be referenced later in this process, and it may be helpful to write it down. See How do I find my generator's Wi-Fi SSID or "MLG" network name?
Continue setup with an iPhone
Note: Continue only after the generator displays SETUP WIFI NOW!. If not, return to Prepare the generator control panel for connection to a Wi-Fi network.
For best results, temporarily disable VPNs, cellular data, Bluetooth, and personal hotspots on the iPhone during setup. Some devices require this for a successful connection.
1. From the home screen of the iPhone, open Settings.
2. Tap Wi-Fi.
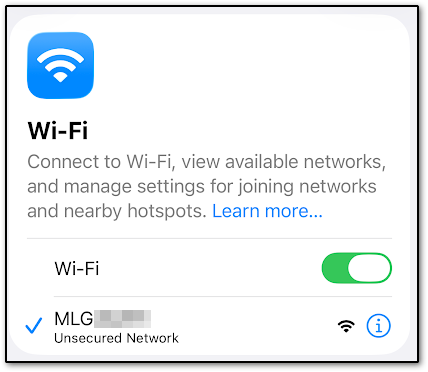
3. From the list of available networks, select the Wi-Fi network that begins with MLG.
4. Verify the connection by checking for a blue checkmark next to the MLG network name.
Note: If the iPhone warns that the network has no Internet connection, choose Keep Trying Wi-Fi. If a captive Wi-Fi portal appears, complete the prompts in the portal to continue. Ignoring the captive portal will disrupt setup.
Configure the generator Wi-Fi connection using Safari (iPhone)
For best results, temporarily disable VPNs, cellular data, Bluetooth, and personal hotspots on the iPhone before setup. Some devices require this for a successful connection.
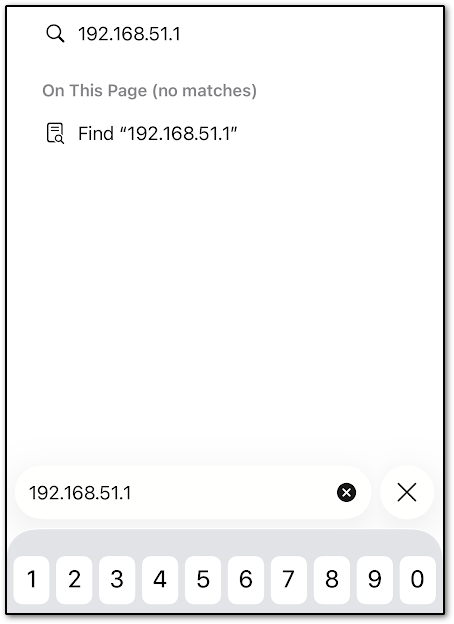
1. Open Safari and enter 192.168.51.1 in the address bar.
Note: If the page doesn’t load, disable autojoin on any nearby saved networks and make sure you’re still connected to the MLG Wi-Fi network.
If the iPhone shows a captive network prompt, select Use Without Internet / Keep Trying Wi-Fi, then retry 192.168.51.1.
If issues persist, temporarily turn Cellular Data off.
2. Select the country and time zone.
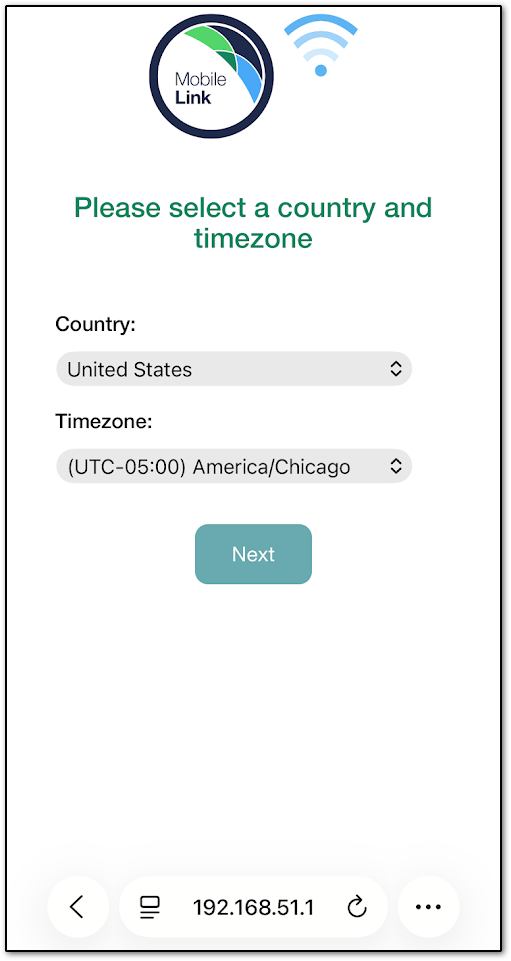
3. Next, choose one of the setup options below.
Option A: Quick setup (recommended)
Start with this option. It’s the simplest method and works in most cases.
1. From the drop-down list, select the home Wi-Fi network (SSID).
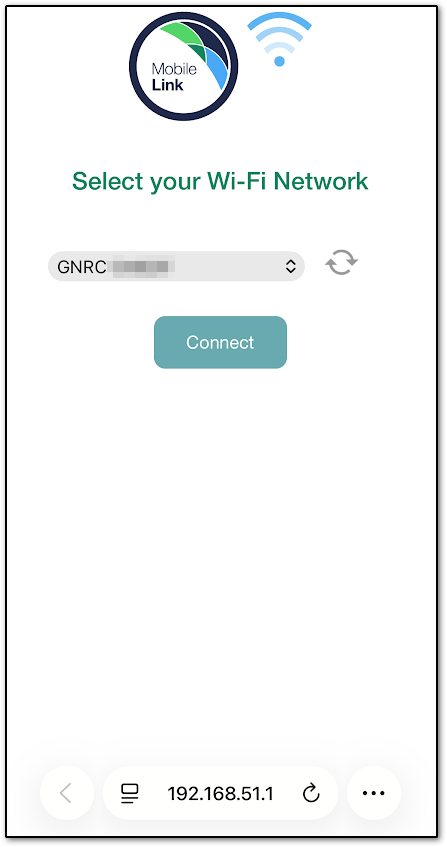
2. Enter the home's Wi-Fi password.
3. Tap Connect.
Note: If your Wi-Fi network is not listed or the connection fails or is inconsistent, try Option B: Advanced manual configuration.
4. When finished, continue to Final setup (return the generator to auto mode).
Option B: Advanced manual configuration (try if Quick setup fails)
This option can help if the quick setup fails or keeps disconnecting. It lets you manually enter your network details and choose the correct WPA/WPA2 security setting.
1. Select Manual Configuration.
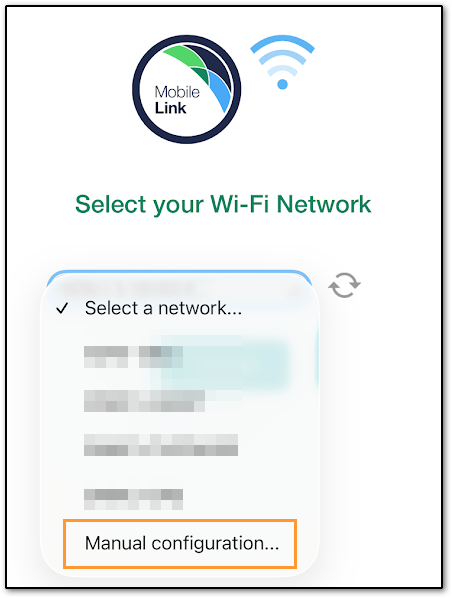
2. Under SSID, enter the Wi-Fi network name with exact characters, capitalization, and spacing.
3. For Channel, select Any. Under Security, select WPA / WPA2 Personal.
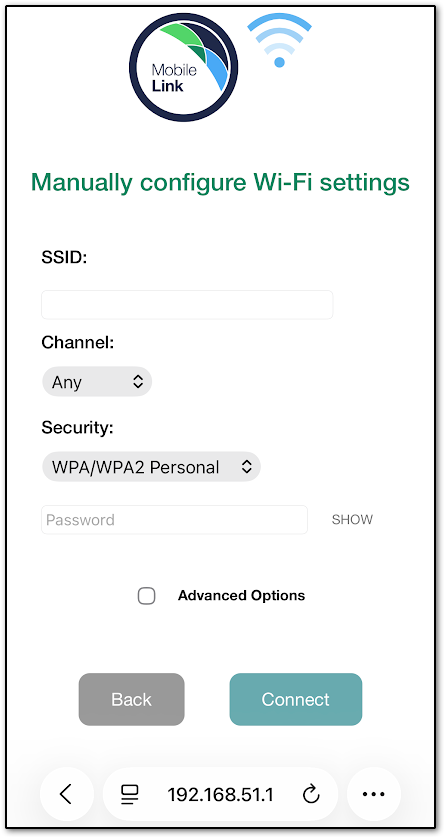
4. Enter your Wi-Fi network password.
5. Tap Connect.
Note: A notification saying the connection failed may display. This message can be ignored. If the generator later displays NOW CONNECTED, you can proceed.
Continue to Final setup (return the generator to auto mode).
Continue setup with an Android device
Note: Continue only after the generator displays SETUP WIFI NOW!. If not, return to Prepare the generator control panel for connection to a Wi-Fi network.
For best results, temporarily disable VPNs, cellular data, Bluetooth, and personal hotspots on the Android device during setup. Some devices require this for a successful connection.
1. Open the device's Settings app.
2. Tap Network & internet > Internet.
3. From the list of available networks, select the network that begins with MLG.
4. Verify the connection by looking for Connected near the MLG network name.
Note: The Android device may indicate that the network has no Internet access (for example, “Connected, no internet” or “Sign in to network”). If prompted, choose to stay connected. If a captive Wi-Fi portal opens or a “Sign in to network” screen appears, follow the on-screen prompts to complete the connection. Do not close or ignore the captive portal, as this will disrupt setup.
Configure the generator Wi-Fi connection using a browser (Android)
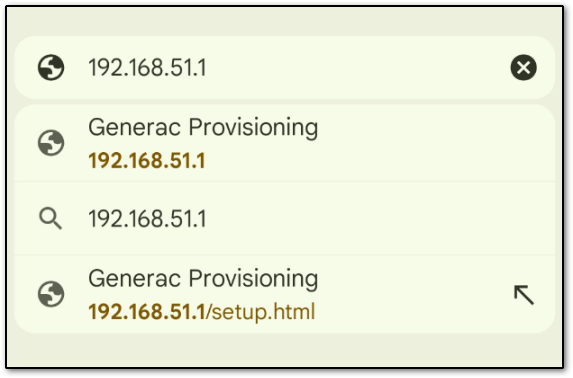
1.Open a web browser and enter 192.168.51.1 in the address bar.
Note: If the page doesn’t load, disable autojoin on any nearby saved networks and make sure you’re still connected to the MLG Wi-Fi network.
If Android shows Sign in to network / Action required / Connected without internet, choose to stay connected (do not switch networks), complete any prompt if it appears, then retry 192.168.51.1.
If issues persist, temporarily turn Mobile data off.
2. Select the country and time zone.
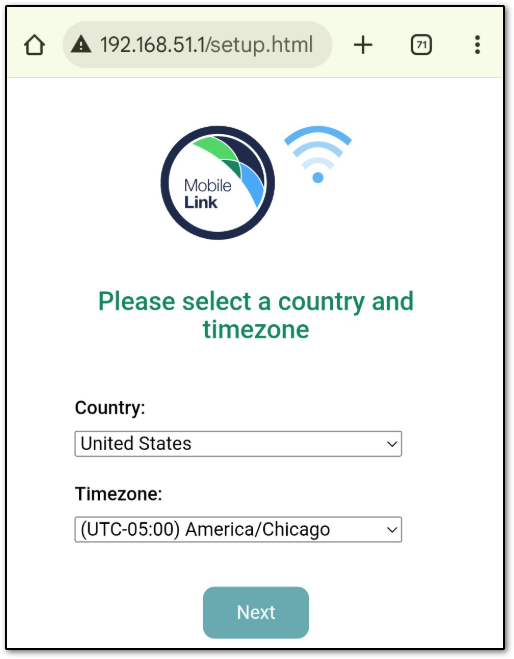
3. Next, choose one of the setup options below.
Option A: Quick setup (recommended)
Start with this option. It’s the simplest method and works in most cases.
1. From the network list, select the Wi-Fi network that begins with MLG.
2. Enter the home's Wi-Fi password.
3. Tap Connect.
4. Verify the connection by looking for Connected, secured near the MLG network name.
5. The Android device may indicate that the network has no Internet access (for example, “Connected, no internet” or “Sign in to network”). If prompted, choose to stay connected. If a captive Wi-Fi portal opens or a “Sign in to network” screen appears, follow the on-screen prompts to complete the connection. Do not close or ignore the captive portal, as this will disrupt setup.
If your Wi-Fi network is not listed or the connection fails or is inconsistent, try Option B: Advanced manual configuration.
6. When finished, continue to Final setup (return the generator to auto mode).
Option B: Advanced manual configuration (try if Quick setup fails)
This option can help if the quick setup fails or keeps disconnecting. It lets you manually enter your network details and choose the correct WPA/WPA2 security setting.
1. Select Manual Configuration.

2. Under SSID, enter the Wi-Fi network name with exact characters, capitalization, and spacing.
3. For Channel, select Any. Under Security, select WPA / WPA2 Personal.

4. Enter the network password.
5. Tap Connect.
Note: A notification saying the connection failed may display. If the generator later displays NOW CONNECTED, you can proceed.
6. Continue to Final setup (return the generator to auto mode).
Continue setup on a Windows computer
Note: Continue only after the generator displays SETUP WIFI NOW!. If not, return to Prepare the generator control panel for connection to a Wi-Fi network.
For best results, temporarily disable VPNs, Bluetooth, and personal hotspots on the computer during setup. Some devices require this for a successful connection.
1. Click the network icon in the system tray.
2. Click the network that begins with MLG to connect to it.
Configure the generator Wi-Fi connection using a web browser (Windows)
1. Open a web browser and enter 192.168.51.1 in the address bar.
Note: If the page doesn’t load, confirm the PC is still connected to the MLG Wi-Fi network. If Windows shows No internet / Action needed, stay connected to the MLG network (don’t switch to another network), complete any prompt if it opens, then retry 192.168.51.1
2. Select the country and time zone.
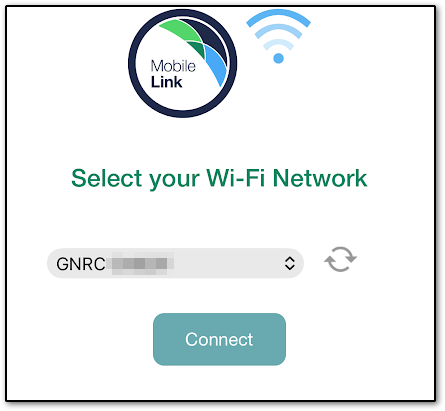
3. Next, choose one of the setup options below.
Option A: Quick setup (recommended)
Start with this option. It’s the simplest method and works in most cases.
- From the drop-down list, select the home Wi-Fi network (SSID).
- Enter the home's Wi-Fi password.
- Select Connect.
If your Wi-Fi network is not listed or the connection fails or is inconsistent, try Option B: Advanced manual configuration.
4. When finished, continue to Final setup (return the generator to auto mode).
Option B: Advanced manual configuration (try if Quick setup fails)
This option can help if the quick setup fails or keeps disconnecting. It lets you manually enter your network details and choose the correct WPA/WPA2 security setting.
- Select Manual Configuration.
- Under SSID, enter the Wi-Fi network name with exact characters, capitalization, and spacing.
- For Channel, select Any. Under Security, select WPA / WPA2 Personal.
- Enter the network password.
- Select Connect.
Note: A notification saying the connection failed may display. If the generator later displays NOW CONNECTED, you can proceed.
6. Continue to Final setup (return the generator to auto mode).
Final setup (return the generator to auto mode)
1. The generator's control panel will display NOW CONNECTED. Press ENTER to continue.
2. The generator's connection signal strength is displayed. Verify the signal strength is acceptable, then press ENTER.
Note: Signal strength of 30% or higher is recommended. If lower than 30% signal strength is observed, consider adding a Wi-Fi booster or extender to improve connection reliability. See How to Determine If an Extender is Compatible with Mobile Link Wi-Fi
3. The automatically determined time zone information may display. Verify the information is accurate, then press ENTER.
Note: If PLEASE SELECT HOUR is displayed, wait a few moments. The time zone information should display shortly. Alternatively, date and time information can be entered manually using the arrow keys.
4. The display should return to the main menu. Using the arrow keys, select SYSTEM, then press ENTER.
5. The screen will display SWITCHED TO OFF. Press the AUTO button.
6. Verify the generator returns to READY TO RUN.
Next steps


